
If you're running Facebook ads - or want to run them in the future - there's an important tool you should use right away. The Facebook pixel helps you and your team get the most out of your Facebook ad budget. In this post, I'll explain what the Facebook pixel is, how you can use the Facebook pixel and the benefits it brings to running Facebook ads.
Before we talk about the Facebook pixel, there are two points that should be mentioned:
- It may well happen that in the meantime (between publication of the post and reading the post) there have been some changes regarding the use of the Facebook pixel. I revise and update my posts regularly. Nevertheless, it can of course happen that something has just been changed and has therefore not yet been taken into account.
- The second important point relates to the topic of "data protection". I am neither a data protection expert nor a specialized lawyer and cannot provide any information on the legally compliant use of the Facebook pixel. I obtain my own information on this from expert lawyers.
All right, now that we've covered everything we need to know in advance, let's get straight to the question of what the Facebook pixel actually is!
Facebook pixel: What is it?
The Facebook pixel is a code that you place on your website. It collects data that helps you track conversions from Facebook ads, optimize ads, create audiences for future ads and retarget people with retargeting ads.
The standard Facebook pixel looks like this:
![]()
The standard Facebook pixel contains the Facebook pixel ID, which in my case is as follows: 2079105992104788. Each Facebook pixel ID is unique, so make sure that you implement the correct Facebook pixel on your website and not just a random one from the internet. We will discuss how and where you can find your Facebook pixel in the course of this article.
TipThe Facebook pixel automatically collects data for you, even if you are not currently running ads on Facebook. This pixel data is very helpful and helps you to display ads, so you should not simply remove the Facebook pixel if you are not running ads. You should also not replace the Facebook pixel, otherwise all data will be lost. My tip is therefore: Leave the Facebook pixel implemented on your website, even if no ads are currently running.
Why you should use the Facebook pixel on your website
By implementing the Facebook pixel on your website, you have the opportunity to track interactions, such as the purchase of a product, via Facebook and thus determine the success of your Facebook ads.
By recording the conversions that are measured via events, you can optimize the Facebook campaigns for the desired event (purchase, lead, etc.). Furthermore, after implementing the Facebook pixel, you can also create retargeting campaigns to address people who have already visited your website. I have briefly outlined the main advantages of using the Facebook pixel below.
As a Facebook advertiser, you have the following advantages when you use the Facebook pixel. You can:
- Create website custom audiences
- Optimize your campaigns not only for CTR and CPC, but also for conversion (purchases, leads, etc.)
- Play out retargeting campaigns based on your website custom audience
- Based on visitors & successful conversions (automatic custom audience) Lookalike Audiences Create
- Use another analysis tool in addition to Google Analytics
- Use custom conversions
- Display Dynamic Product Ads (personalized display of product ads based on product views, among other things)
- Use cross-device tracking
Some advantages of the Facebook pixel explained
1. website custom audiences can be created
Website Custom Audience is a targeting option that uses the Facebook pixel to match visitors to your website with people on Facebook. A Website Custom Audience therefore only contains people who have also visited your website. This allows us to create different groups of custom audiences, so we can also only include certain people in the custom audience who have carried out specific interactions. This also makes it possible to create a Website Custom Audience exclusively from people who have purchased products or sent a contact form.
2. campaign optimization
By using the Facebook pixel, conversions can be assigned to Facebook campaigns and ads. Conversion attribution is the prerequisite for optimizing campaigns for conversions. It can also be used to determine which target group and ad leads to the best conversion values. Without the use of the Facebook pixel, campaigns can only be optimized using CPC and CTR values.
3. further analysis tool in addition to Google Analytics
Furthermore, by using Facebook advertising, we have an additional analysis tool that we can use to evaluate the advertising campaigns. This is particularly helpful because Google Analytics has a different attribution model to Facebook, which means that the conversion figures provided are too low.
4. dynamic ads
Dynamic Ads is an advertising format from Facebook that automatically displays ads on Facebook, Instagram and the Audience Network to people who have looked at products in the online store but not purchased them. This type of advertising generally leads to very good ROAS values (return on advertising spend values) and can be placed consistently.
5. the Facebook pixel enables cross-device tracking
The Facebook pixel also measures cross-device conversion. Imagine your customer sees a Facebook ad for a product on their smartphone while standing in line at the supermarket. The likelihood of an immediate purchase is very low.
However, it is quite possible that your customer will visit your website later when they are sitting at their computer and make a purchase. Such cross-device conversions are becoming increasingly common as people switch between their smartphones, tablets and computers. Thanks to the Facebook pixel, we can attribute the conversion to an ad even if the customer uses different devices during the purchase process. For example, an audience that clicked on an ad on their iPhone and then later converted on their desktop can be tracked - and vice versa.
Create Facebook pixel in the Business Manager
Let's now take a look at how you can create the Facebook pixel in your Business Manager.
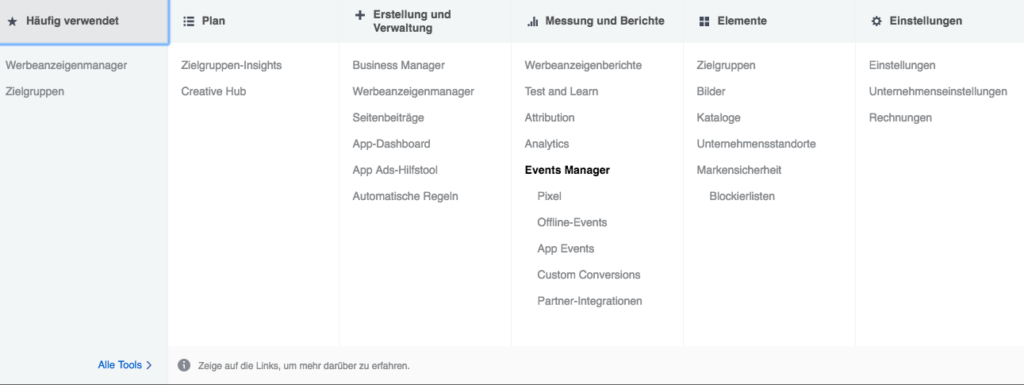
To create a Facebook pixel in your Business Manager, click on the menu item "Pixel" under "Measurement and reports".
On the next page, you have the option to create the Facebook pixel.
First, we name the Facebook pixel and enter our website URL.
Set up Facebook Pixel: How-to
Now that we have created the Facebook pixel, let's take a look at how we can integrate the pixel into our website. To do this, we will first integrate the pixel with the help of the Google Tag Manager. In the next example, I will show you some WordPress plugins that you can use for implementation.
Install Facebook pixel with Google Tag Manager
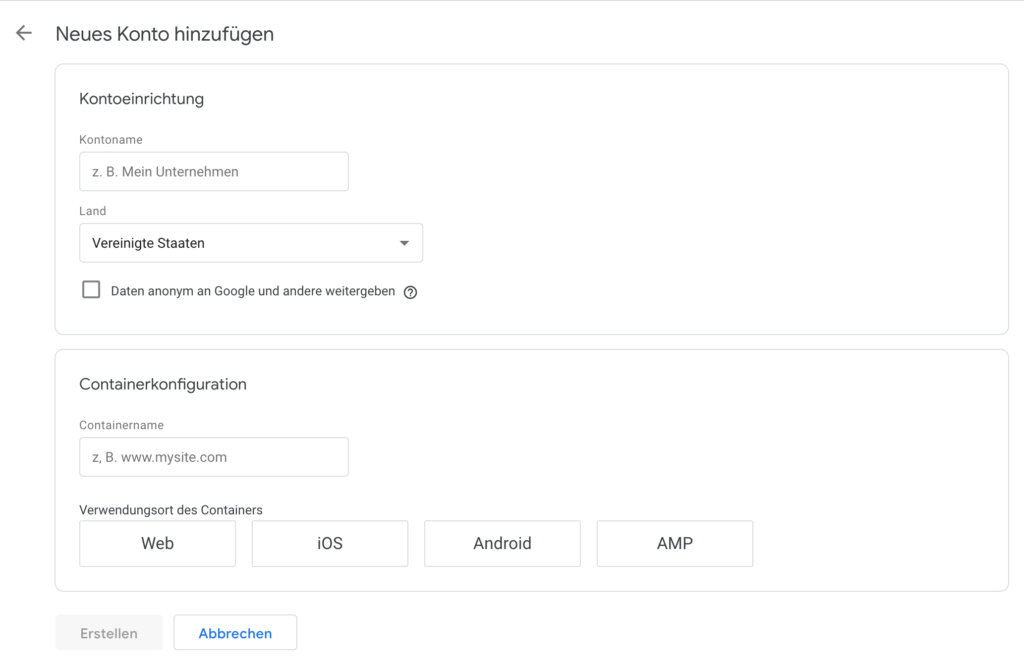
First we need to create a Google Tag Manager account, you can do this here make.
We will fill in all the necessary information. You can certainly do this without outside help 😉
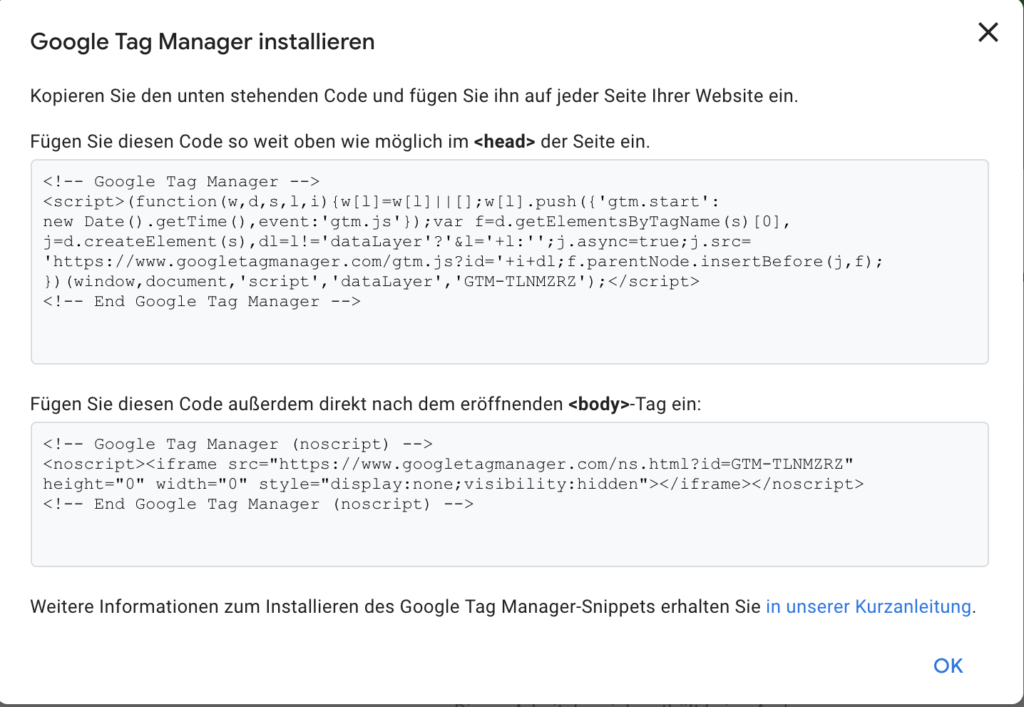
After you have created the account, Google will redirect you to the Google Tag Manager workspace. Here, a pop-up usually appears immediately with the Google Tag Manager code that needs to be implemented on your site.
Once this has been done, we click on the "Tags" tab in the Google Tag Manager workspace and create a new tag. We call this "Facebook pixel". Under "Tag configuration", we select custom HTML, then go back to Facebook and install the Facebook pixel.
To demonstrate the manual process, we select the function "Perform the manual installation of the pixel code yourself". Of course, you can also select the other two options.
![]()
In the next step, your pixel code will be displayed under point 2, which you can simply copy. However, make sure that the extended comparison is deactivated under point 3, as this is not permitted in Germany.
In the next step, we can insert the Facebook pixel into the HTML tag configuration.
![]() Once we have inserted the Facebook pixel, we also need to define when or what triggers the pixel. To do this, we select the predefined selection "All Pages" under "Trigger" so that the Facebook pixel is triggered every time a page is accessed. Then we click on "Save", then on "Send" and finally on "Publish" so that the Google Tag Manager is published on our website. And now we have published the Facebook pixel on our website!
Once we have inserted the Facebook pixel, we also need to define when or what triggers the pixel. To do this, we select the predefined selection "All Pages" under "Trigger" so that the Facebook pixel is triggered every time a page is accessed. Then we click on "Save", then on "Send" and finally on "Publish" so that the Google Tag Manager is published on our website. And now we have published the Facebook pixel on our website!
Implementing Facebook pixels in a WordPress site
Let's now take a quick look at how you can integrate the Facebook pixel into your WordPress site without Google Tag Manager.
First we install the Pixel Caffeine plug-in to our WordPress page. We then select the Pixel Caffeine plug-in in the WordPress backend.
Pixel Caffeine now prompts us to complete the Facebook pixel setup. We have two options for this:
- Manual setup - here we insert the pixel ID manually so that Pixel Caffeine inserts the pixel either in the header or footer area.
- Facebook Connect - here we simply connect our Facebook account and Pixel Caffeine takes care of the rest.
I recommend using the Facebook Connect method, as this makes the connection easier. Once the variant has been selected and authorization has been accepted, the name of the ad account and the Facebook pixel ID will appear.
Conversion tracking using the Facebook pixel
In order to create successful Facebook campaigns, it is essential to set up conversion tracking. Through the use of the Conversion tracking you can see exactly which ad and target group is particularly responsive to your offer. You can also create a Custom Audience of people who have completed the desired conversion. We can then create a lookalike audience based on this custom audience. This makes Facebook advertising really fun!
There are two different methods for measuring conversion:
- Conversion tracking with custom conversion
- Conversion tracking with standard events
Presentation of Facebook Pixel events
In addition to the standard Facebook pixel, which I described at the beginning, there are also Facebook pixel events. We use events to describe certain interactions (e.g. purchasing a product, making contact, etc.) on our website. In order to measure the desired interactions, we must also include these events on our website. However, we should first discuss the different types of events.
Standard events are event types predefined by Facebook, including event codes.
We can track interactions on our entire website with both standard events and custom conversions. The advantage of standard events is that we have more functions at our disposal. Custom conversions, on the other hand, are much easier to set up.
When using standard events, additional code snippets must be implemented on the website, which is not the case with custom conversion. You can find out how to implement standard events on your website using the Google Tag Manager in the course of this article.
Facebook itself recommends working with Custom Conversions if you are not familiar with editing your website code. However, if you are familiar with adding code snippets, then you should work with standard events as much as possible.
| Standard events | Custom Conversion |
| Additional code snippets required | No additional code snippets required, but are created using URL rules |
| Summarized reports | Separate reports |
| Customization with parameters | Customization through URL rules |
| Support Dynamic Ads | Do not support Dynamic Ads |
Facebook standard events
There are currently (as of March 2019) 17 standard events, which are listed below.
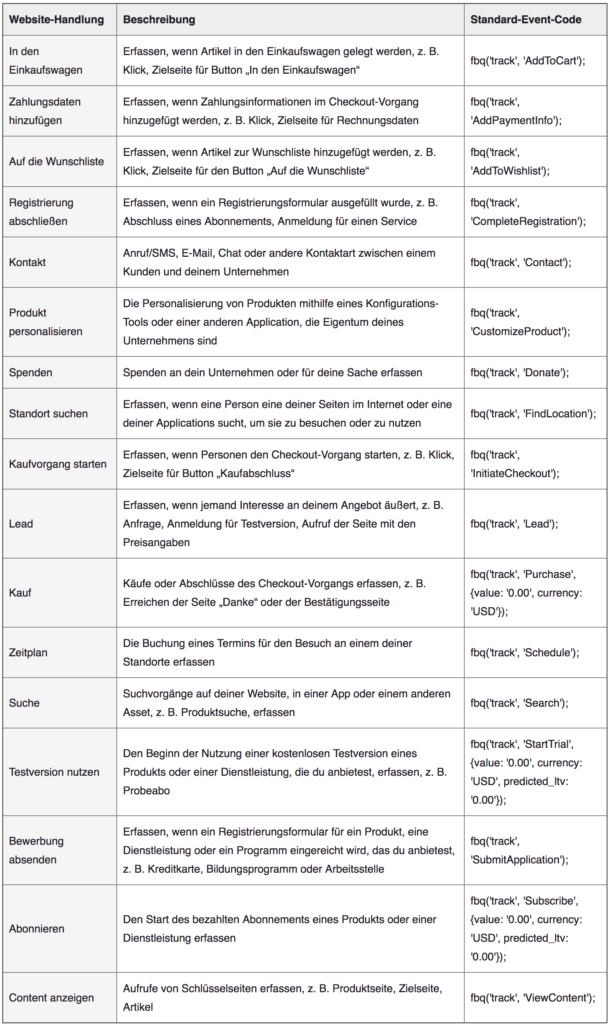
With Standard events you must, as already mentioned, create the standard event codes shown here on the respective pages, and only on the page where the conversion takes place.
Integrate conversion tracking
Installing the Facebook pixel via the Tag Manager should generally not be a problem. As most webmasters also want to measure conversions on their website, I will now show you how I integrate a lead event on my website using the Google Tag Manager.
Brief explanation of the example:
I would like to measure the contact request that has come about via my website using a lead event. If you click on https://tobias-dziuba.de/kontakt/ and contact me via the contact form, you will be sent to a "Thank you" page after submitting the contact form. If the "Thank you very much" page is accessed, the Facebook pixel should measure a lead.
First we need to create the lead event in the
"Section 2.2: Copy the event code"
copy. The lead event for me is:
fbq('track', 'Lead', {
value: 10.00,
currency: EUR
});
In Google Tag Manager, we select "Tags" again and create a new "user-defined HTML tag".
The only difference to the installation of the Facebook pixel is that we now define a different trigger. As Trigger configurations we select "Page view" and set it so that the event is only triggered when the "Thank you page" is visited. To do this, we select "Some page views" and name the lead page.
![]()
Now we save the trigger and the event and the Leads measured via the Facebook pixel without having to make any adjustments to the code.
Create custom conversion
The Custom Conversion Tracking is aimed in particular at conversions that can be measured via URL tracking. This is particularly advisable when registering for a newsletter or downloading an e-book. To set up Custom Conversion, go to the Ads Manager under Measurement and reports on Custom Conversion. However, if you have installed the Pixel Caffeine, you can also create Custom Conversion directly via your WordPress backend.
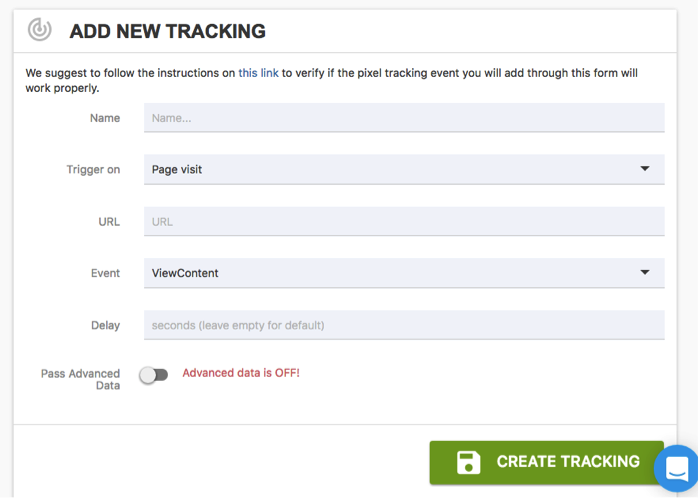
First, give your custom conversion a name for later identification. Then you select Trigger on "Page Visit" from. Now enter the URL to which the user is sent after making a conversion. Then we select under Event select the "Custom Event" option.
Create custom conversion via the ad manager
If you are not using the Pixel Caffeine plug-in, I will now show you how to create a custom conversion via the Ads Manager. To do this, we go to Measurement and reports -> Custom Conversion -> Custom Conversion.
Here you can enter the respective URL to which the visitors are sent after they have made the conversion. You can enter both a static URL as well as a dynamic URL to measure your custom conversion. You also have the option of adding your conversion to a category.
Now we name our custom conversion, add a conversion value to it and we have already created a custom conversion via the Facebook Ads Manager!
Create Website Custom Audience
Create a custom audience on a WordPress site
Also in the creation of Custom Audiences we can use the Pixel Caffeine plug-in. To do this, we simply select the "Custom Audience" tab and we can create a custom audience from our website visitors.
Once we have named our custom audience, we can narrow down the time period in which we want to consider the website visitors. The range extends from 1 to 180 days. We can also only target people who have visited certain pages (URL to include). One use case for the functions (URL to include & URL to exclude) is, for example, if you want to target people who have placed products in the shopping cart of your online store but have not yet purchased this product. Under "Special Filters", you can segment your custom audience even further (e.g. end device, gender).
Create Custom Audience via the Facebook Ads Manager
To create a Custom Audience via the Facebook Ads Manager, we go to Elements -> Target groups. There we select under Create target group "Custom Audience" from. Four options then appear when selecting Custom Audiences (customer file, website traffic, app activity and interaction). We select the "Website traffic" option. Here, too, we find the same selection functions as when creating via Pixel Caffeine. Once you have found the right target group for you, click on "Target group Create" and you have already created a custom audience.
I am regularly asked why the number of website visitors does not match the number of visitors recorded by the Facebook pixel. There are several reasons for this, which must be taken into account when comparing the Facebook pixel data with data from other analysis tools:
- Most web analytics tools, such as Google Analytics, count individual sessions. This means that if the same person accesses a website via a smartphone and then accesses the website again later via a different device, two visits are usually measured. Facebook, on the other hand, measures people and not sessions. Therefore, if a person visits a website twice, Facebook only counts one person and not two sessions,
- It is also quite possible that you have restricted your Custom Audience with certain rules so that not all visitors to a website are included in the Custom Audience (country restriction, URL restriction, etc.).
- Both ad blockers and script blockers are widely used nowadays. The use of ad blockers can also lead to the Facebook pixel being blocked.
- Opt-in for the use of the Facebook pixel: For some advertisers, the Facebook pixel is only activated with prior consent (opt-in). On the other hand, analysis tools often run without consent, which ultimately results in different data.
Check Facebook pixel
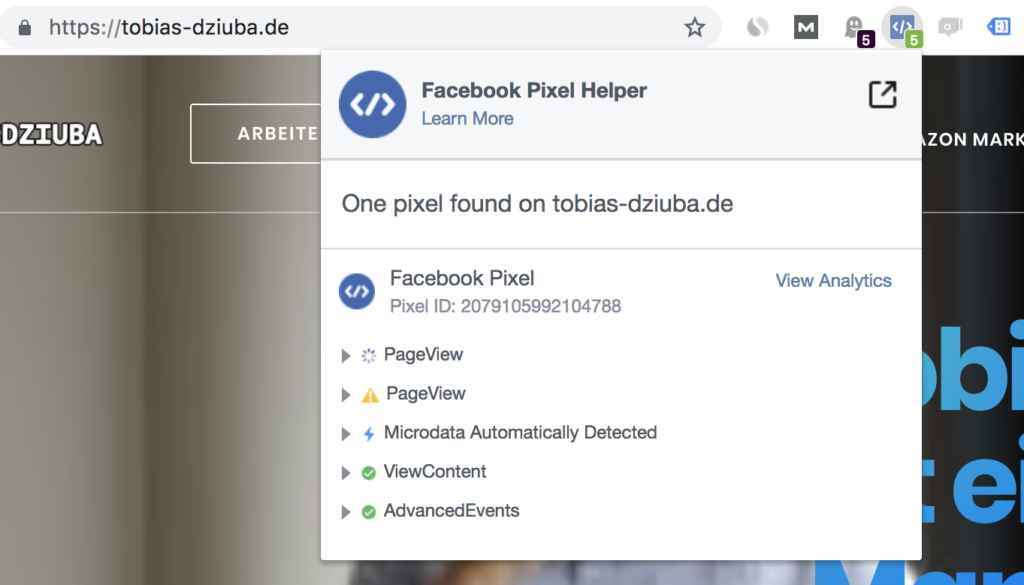
We have now implemented the Facebook pixel on our website. But how do we know if the pixel is triggered? If you use the Google Chrome browser, I recommend using the Facebook Pixel Helper:
The Facebook Pixel Helper is a browser extension that shows you whether the pixel is actually triggered. After you have installed the plug-in, call up the website that you have pixelated. If the plug-in displays a green number when you call up your website, the Facebook pixel has been properly installed. If you now click on the icon of the browser extension, a detailed display of the events that were triggered when the page was called up will also appear.
Please note that ad blockers and script blockers can also block the Facebook pixel, so that an error message may appear here.
 Another alternative is to open the Facebook Event Manager and take a look at the events that have been triggered. Here you can see in detail which events were triggered and when. Check these figures with figures from other analysis tools to identify potential sources of error at an early stage.
Pixel event data in the Events Manager
Next, I would like to explore the Events Manager with you to show you what information you can get from there. To do this, click as usual on All tools -> Events Manager and then on the name of your Facebook pixel.
Here you can see the number of events that have been recorded by the Facebook pixel over time.
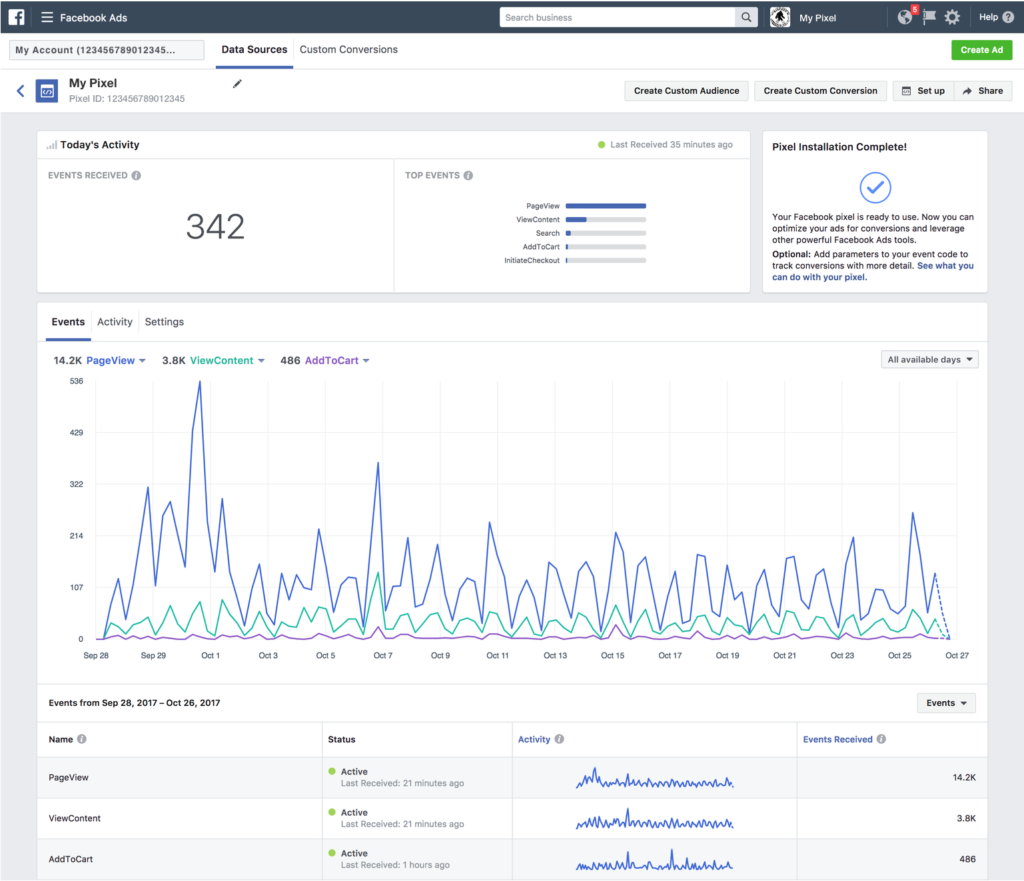
To evaluate a specific event in more detail, we can click on "View details" under the event name. We can now use the drop-down menu to display the events according to devices, URLs and domains. This setting is particularly helpful for identifying possible errors in the implementation.
We have another interesting evaluation option if we go to "Settings" in the Events Manager. Here we can see all the first website custom audiences as well as a display of the custom conversions created.
![]()
Creation of a Facebook conversion campaign
We have now presented all the possible advantages of the Facebook pixel, how it is installed and what great evaluations can be made. Next, we will show you how to create a conversion campaign.
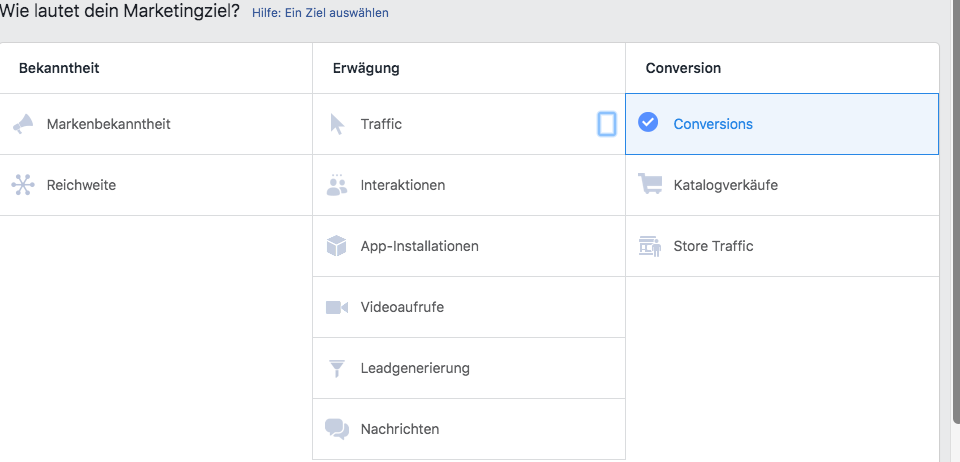
In the first step, we select "Conversion" as the campaign objective.
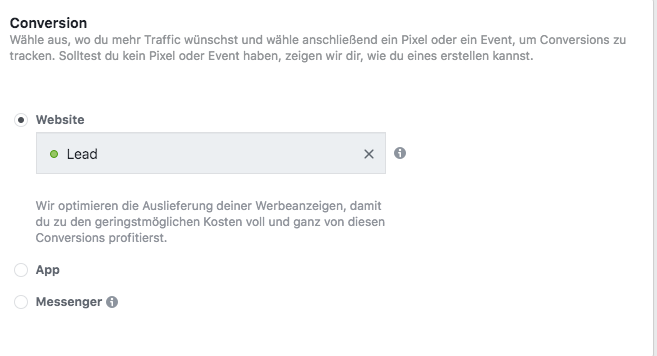
We then create the ad group. The first step here is to select the conversion. We can choose between conversion on the website, app and in Messenger. In my example, I select "Website" and the lead conversion event.
Once you have selected the desired conversion goal, the other options for target group and ad format are identical to other campaign goals.
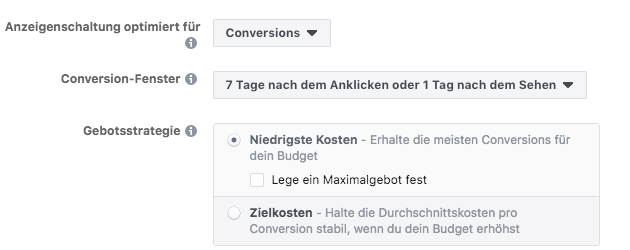
With the option Optimize ad placement for you should select "Conversion".
Conclusion Facebook Pixel:
The Facebook pixel is the basic prerequisite for running successful conversion campaigns on Facebook. In addition to the possibility of running conversion campaigns, the Facebook pixel also offers many other advantages, such as the creation of retargeting campaigns, the evaluation of funnel steps and the creation of custom and lookalike audiences.
I hope that this article has made it a little easier for you to use the Facebook pixel. If you have any further questions, please feel free to contact me by email at any time!


")


